

My Natter build has motivated me a lot. I always had problems painting camouflage because it never looked as good as I wanted so I avoid painting it like the plague. Painting the Natter was a challenge and gathering the courage needed for confronting it took me some time and a lot of thoughts, but it ended looking good! So good that it made me gain some confidence in myself for deciding to build and paint another German warbird.
Stolzdorf’s skies were still pretty empty of German air power so I decided to build the most iconic German plane; the Messerschmitt BF 109, Emil version. Even when Charly printed me one in filament, I decided to get one of those balsa wood Guillow’s kits just for the fun of building it and also for making something new. The 3D printed plane will be used at some point in my diorama, probably spli in parts inside or next to an hangar, or I might build it like it crashed. Nothing is wasted in Stolzdorf!
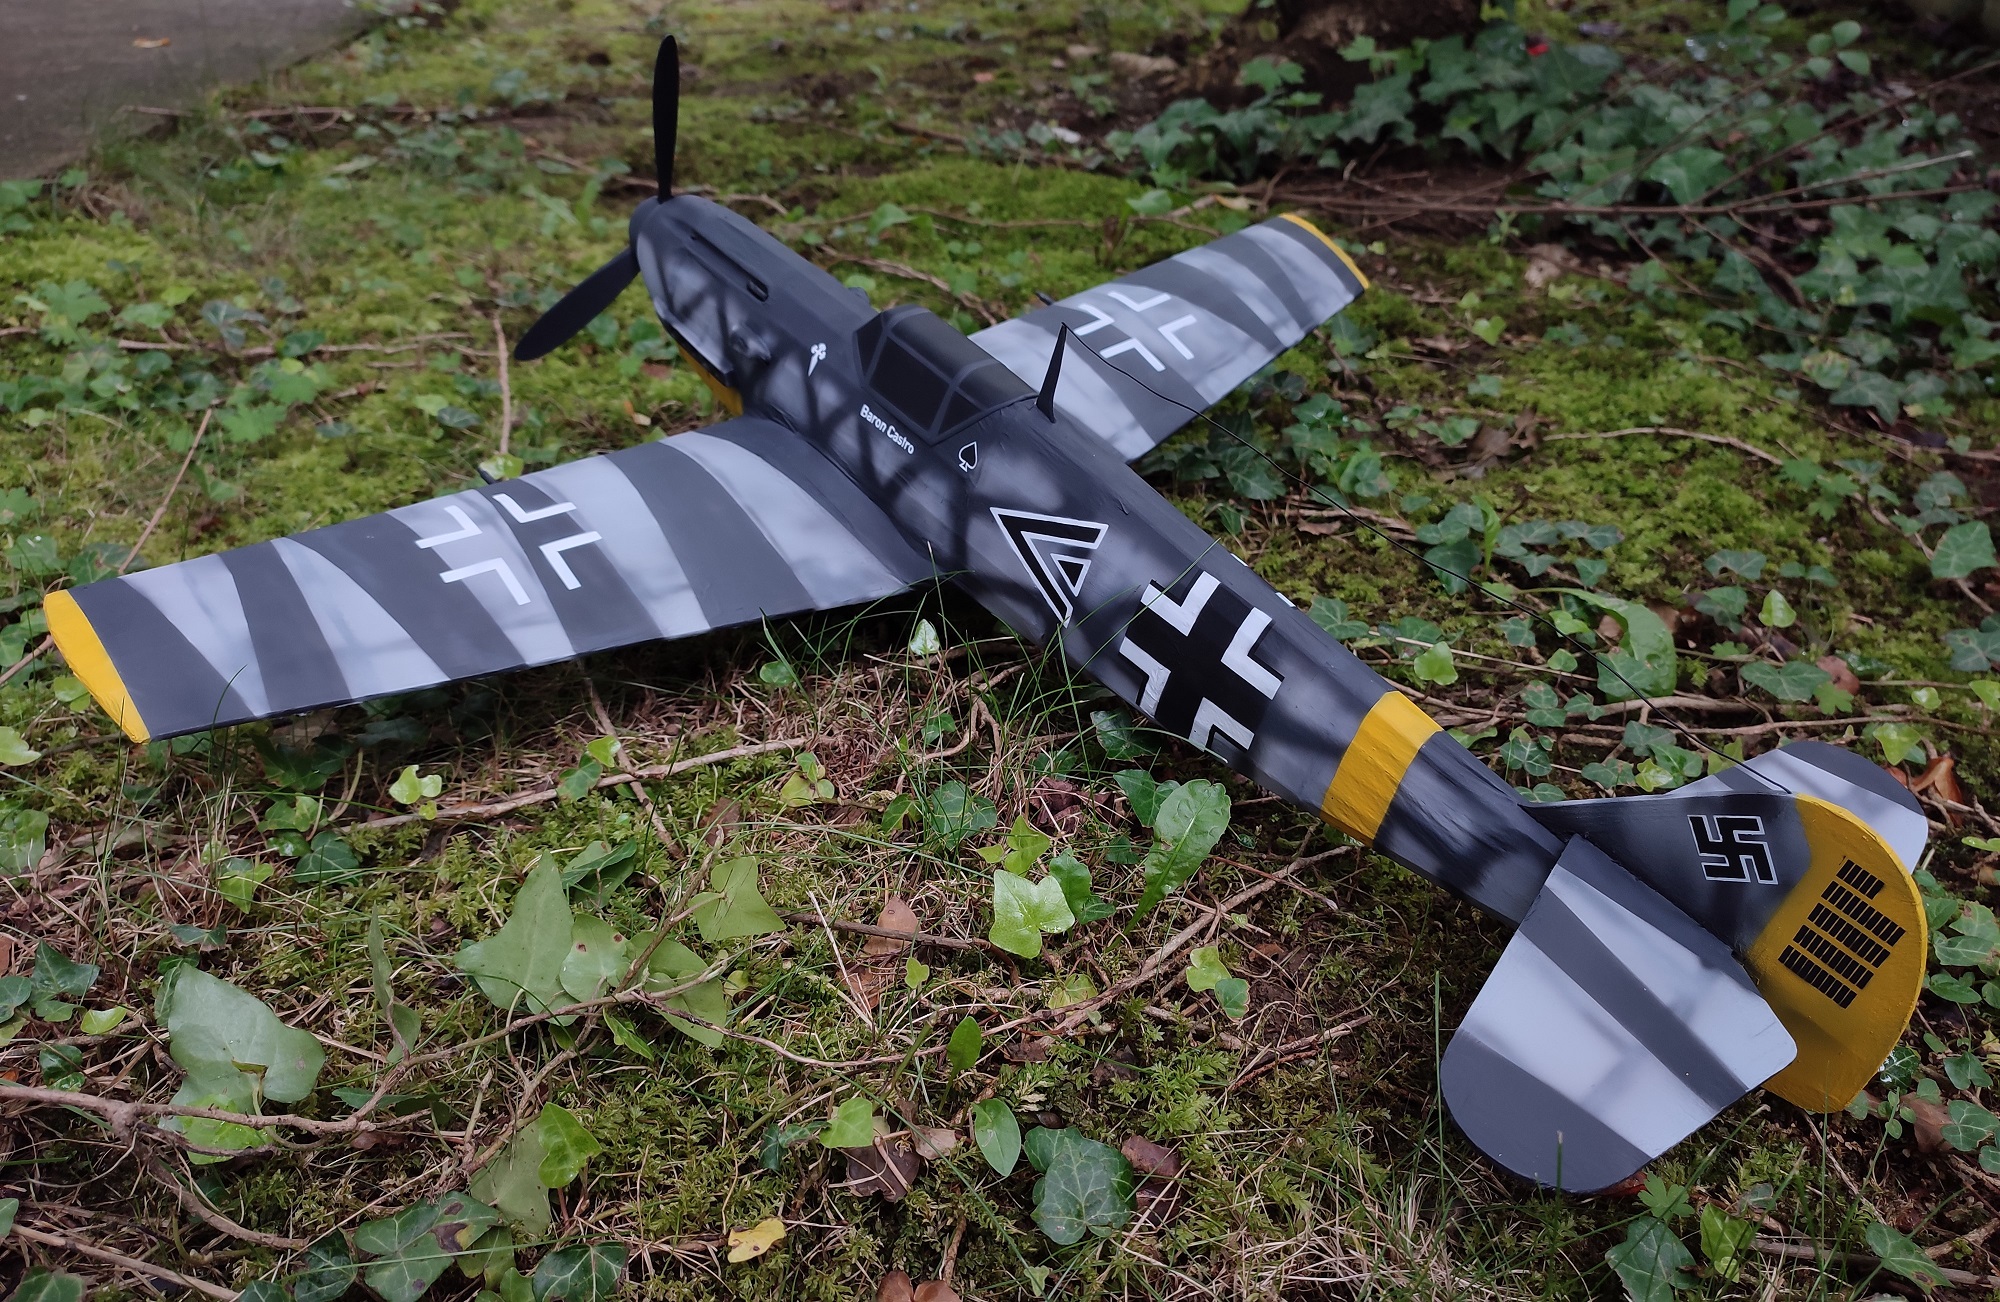
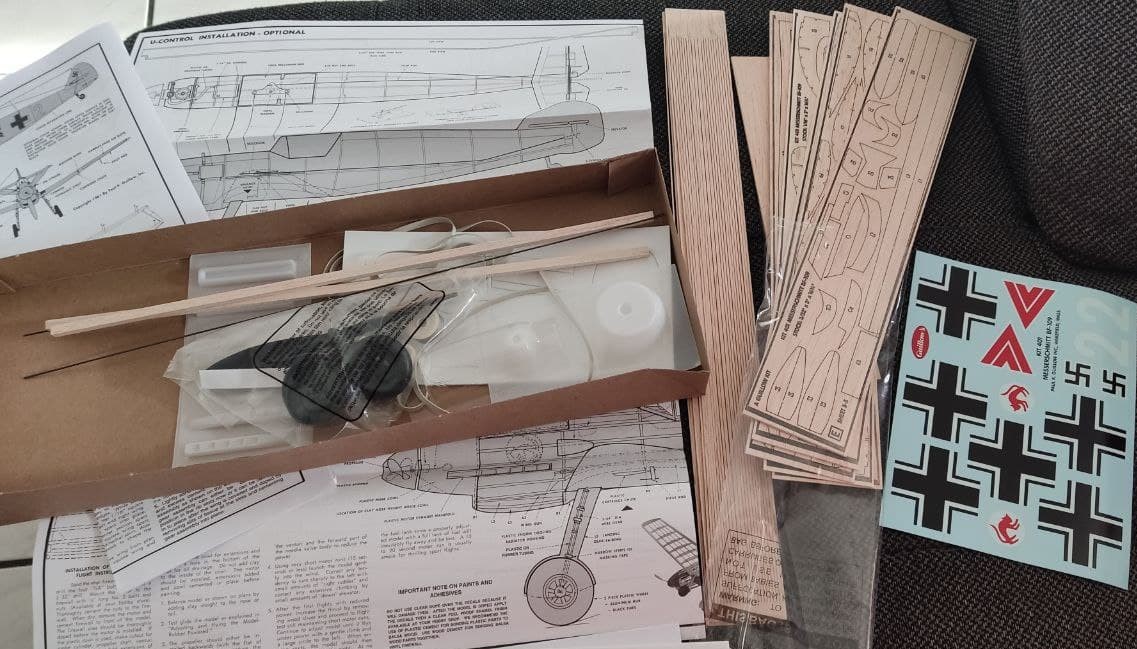
So ladies and gentlemen, this is my BF 109 E. A Guillows 401 Laser Cut kit, in 1/16 scale.
But, of course when it arrived it was not as cool as it is now. In fact, the coolest part of the entire kit was the box art.

What is inside the box? Not too much, but enough for the build.

–
Balsa wood sprues, which come already laser cut, so taking the parts away is an easy and smooth task, and… all of this!
Which is:
-Balsa stringers, plenty of them for the build and way extra for other uses.
-Plastic made wheels.
-Soft plastic molded parts for adding extra detail, which are a pain to work with.
-Decals that I will never apply because I use my own stencils.
-Ugly non scale dual blade propeller and a rubber band, if you decide to rubber fly it.
-Enough paper tissue for covering all the plane, not showed in the picture. But it is just paper, lol.
-The manuals.
How is it built?
In the only way possible. You place the manual over a thick piece of cardboard or soft wood, then you cover it with transparent plastic film, and then you can start pinning and gluing the parts over it. Don’t forget to add the plastic film or you will glue the wood to the plans. I used plastic film that my wife uses for covering the leftovers in the fridge, but anything that is soft and transparent will work. This is pretty old skool modelling, like our grandpas did in the past. I like it!

Placing the ribs in 90 grad was a challenge by itself, but I had the idea of using Lego blocks to keep all the parts straight until the glue was dry. And it worked.
Once all the plane was assembled, it was time to cover it. I have seen many people having huge problems with this part of the build, which scared me to death. Plenty of beautiful builds are ruined at this point. Not many tips that I can give here besides using a mixture of 50% water and 50% white glue and apply just a little bit of it to the edges and never in the center parts, as the manual tells you.
Once I applied the tissue it looked good to me, so I was very reluctant to do the next step, which was spraying some water over the entire model. I was still very afraid of ruining it, but hell, I had to try it. I pulverized some water over the model and it started shrinking and looking horrible, and I thought I ruined it.

I was pulling my hair in despair and almost beginning to cry. I put it apart and I started looking in internet where to get more tissue or any other alternative… and then is when I realized the tissue dried and looked AWESOME, that tissue was now tense.


Aircraft parts lifting! What kind of wizzardy is this???!!!
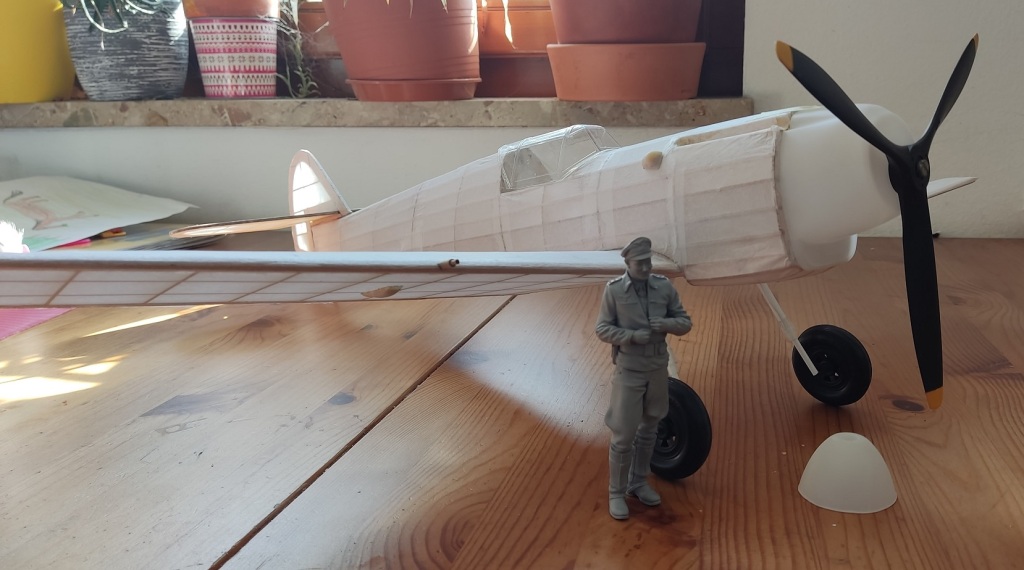
As I have mentioned above, the model came with a horrible oversized two blade propeller which made my eyes bleed. Some skilled guys carve their own propellers in wood, but I am not experienced enough neither have the time and patience, hence I ordered one from Aliexpress and called it a day. Unfortunately, I found it to be too big upon arrival, as can be seen in the previous pictures. I combed the internet again looking for a decent propeller either already made in physical form, or in digital form, but to my sorrow I was not able to find anything suitable. All of them were either too big, too small or way too modern that resembled more a fantasy shuriken than a scale propeller. I had the last card in my sleeve which was asking Charly or Daryl to design and print one for me, but prior to that I had the idea of cutting and sanding the propeller I already had… and it worked! Sure it is not exactly like the original BF109 propeller, but heck, it looks good enough to me.
Once the plane was fully built I noticed it was way too fragile and I was afraid of breaking it with my own breathe. I asked to some experienced modelers about what to use and their answers were as varied as the modelers were. It ranged from filling between ribs with wood (which was too late at this point) to applying loads of paper coats or to spray several coats of varnishes. I took the cheap route and airbrushed a mixture of water and white glue and it did the job. Sure thing this is not bulletproof, but it looks like it is safe to touch it with my bare hands now.
The plane struts were made with scrap things I found at home, steel wire, lollipop sticks, ball point pen parts and more. I’d rather have gotten already made parts by Guillows instead of being forced to be creative here, but well, I managed to save the day.
Painting process.
Sometimes I wonder why do I waste time describing the painting process because it is always the same, lol. Rattle can of primer, preshading, painting the model, painting the markings using my world famous stencils and matt varnish at the end.
Many times I paint my models several times until I really like the look of it. This is particularly frequent when I paint models with camouflage. I can’t remember the number of tries painting my King Tiger, I believe I don’t even have enough fingers in my hand for counting it. Fortunately this was not the case and I managed to get a decent paint scheme on my second try. The first one had also dark green dots along the fuselage and dark green stripes in the wings, but I did not like how it looked, and I decided to start over again. This new camo might look uncomplete to some, but it looks amazing to my eye and captures the image of the Stolzdorf’s downfall at the end of the war, with shortage of everything. I absolutely love it.
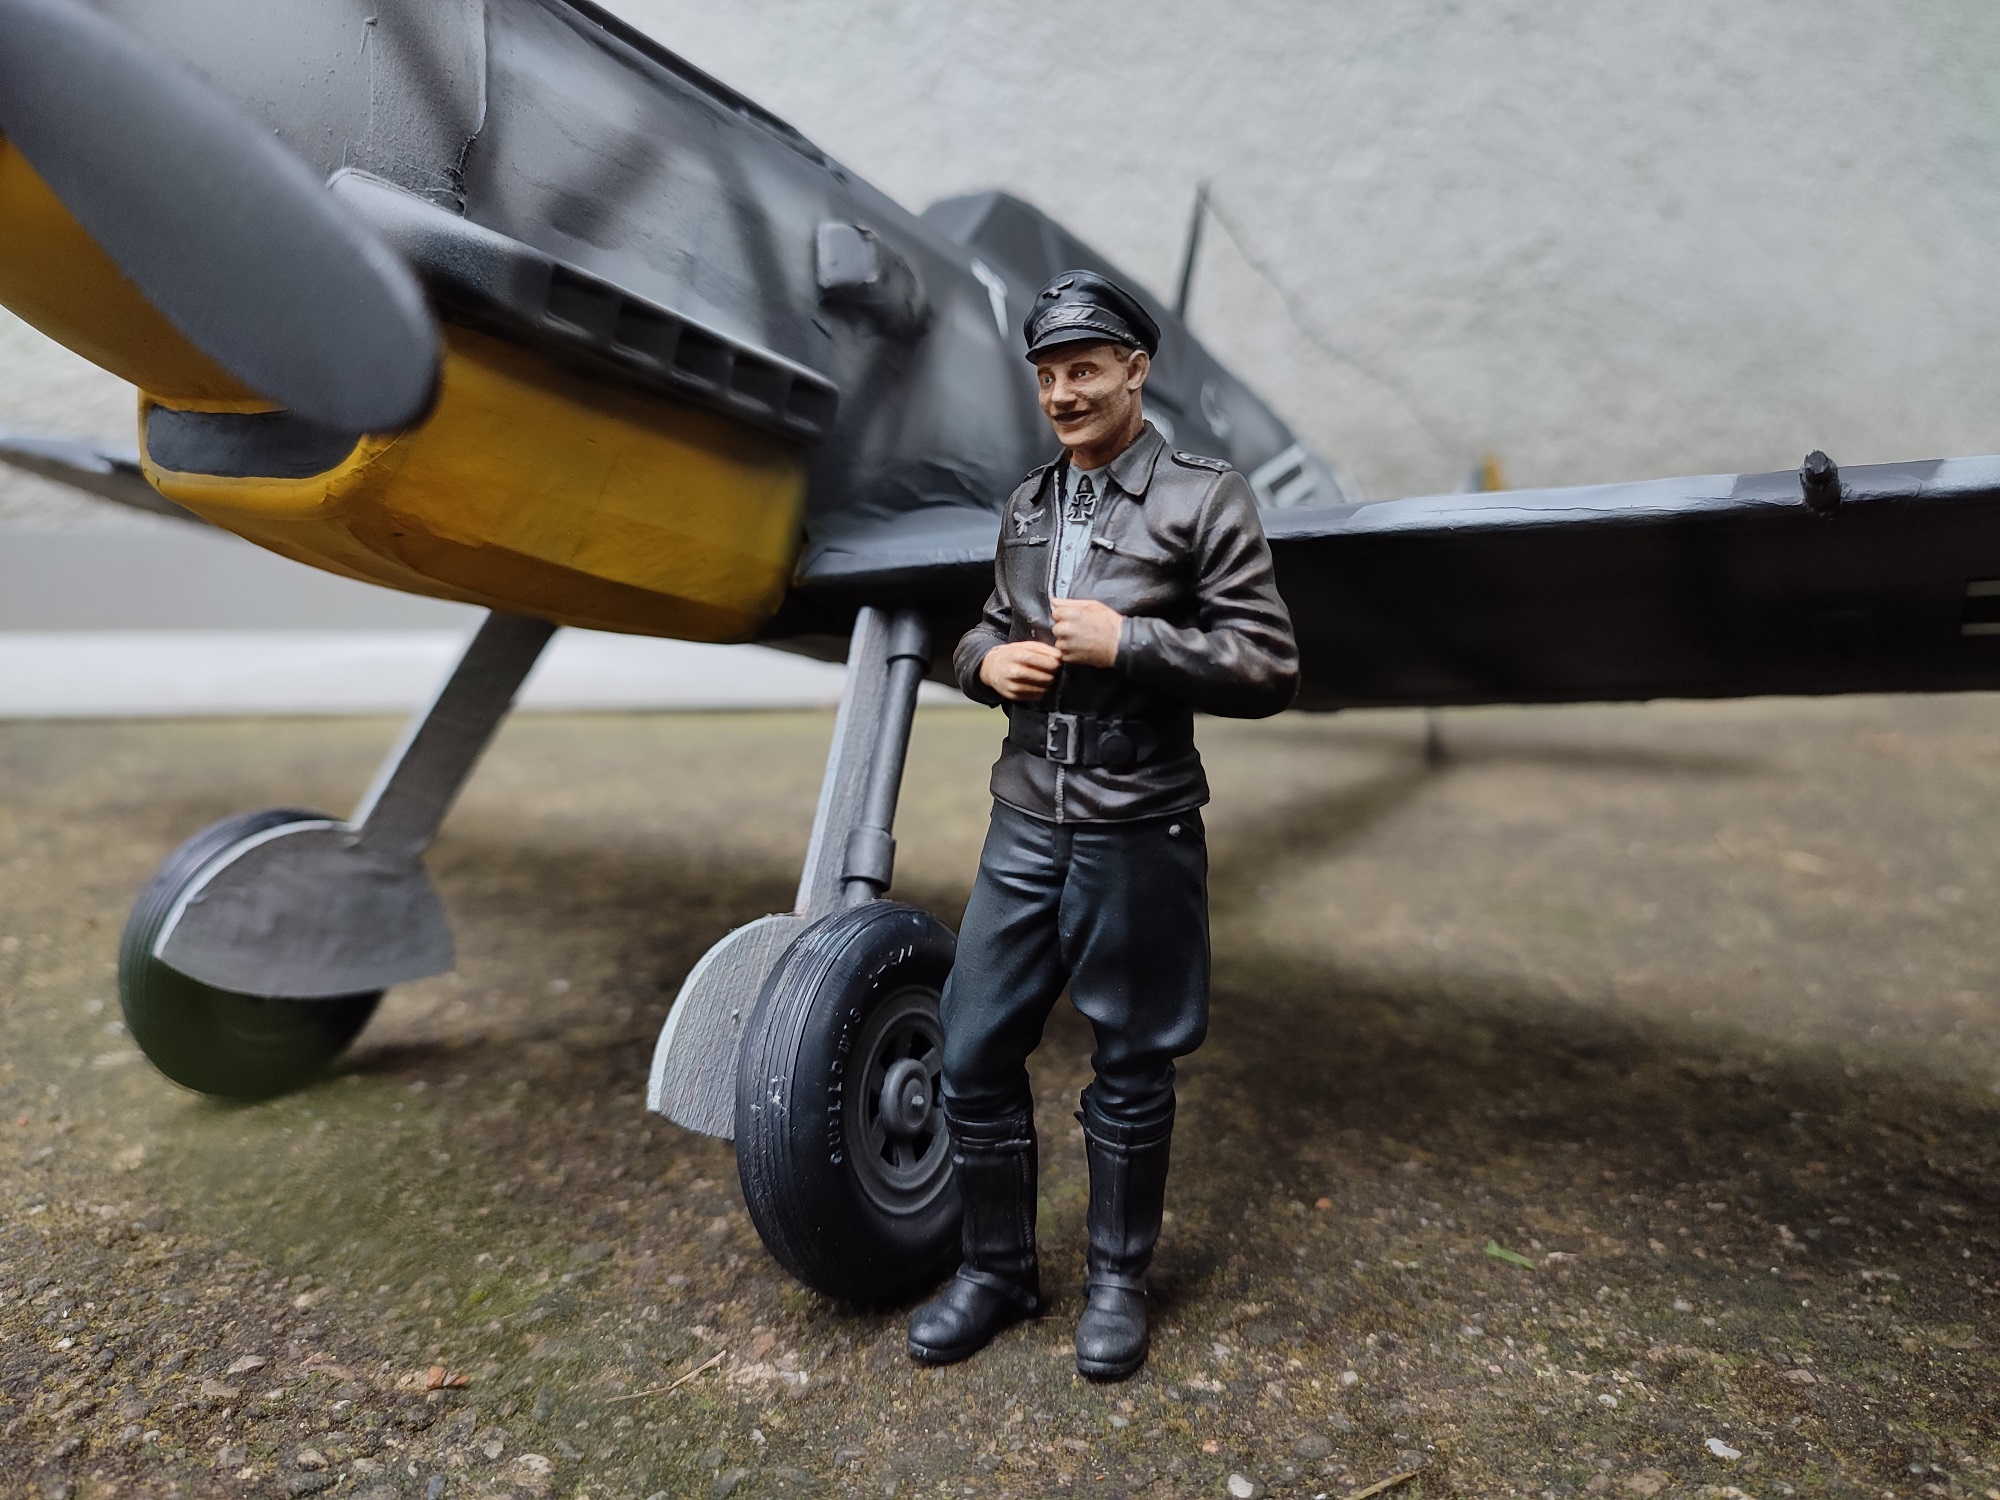
Some guys asked me about the plane markings and pilot name. Well, long story short, that Cross is the Spanish Santiago’s cross which is part of the official Stoldorf’s flag. “Baron Castro” is the choosen pilot name. This name choice is not aleatory but well thought, and it is due to the Spanish heavy metal band, called “Baron Rojo” (Red Baron), well, the singer and main guitar are brothers and their surname is “De Castro” so I believe this makes a humble homage to them. The Ace of Spades, is just an Ace of Spades, because I ran away of creativity. But being black with white outline matches the markings and it looks awesome in the plane.
The pilot.
This figure was briefly introduced in my Ford T entry, but if you have not read it, here it goes again: This figure, which has been 3D printed by my friend Charly, is supposed to be the Luftwaffe ace Erich Hartmann but definitely reminds me of Marlon Brando in the film “The Wild One”. Not much left to write because it arrived in one piece so there was nothing to build. Just an easy and quick paint job. Looks awesome when placed next to the plane, with the other pilots or just somewhere in the diorama.
Final thoughts.
I have enjoyed this Old Skool modelling a lot. Most of my builds are focused in having plenty of radio controlled functions like lights, sounds, music, smoke and moving parts, taking me years to finish the build. This has been the opposite: Balsa wood, paper and paint, that is it! Sure it is fun to drive/pilot your toys but at this point I considered I did not need any more RC toys in my scale city and I decided to keep it static, either in the ground or hang it in the roof in an eternal Dawn Patrol.
The kit itself was kinda cool and a new hobby experience. If you are used to build Japanese plastic models that come with super detailed manuals, with few letters and plenty of images and step-by-step instructions, this is the opposite, lol. Few images but plenty of text. I liked the kit as it as it is, but if it was possible, I’d add some things to it, like better quality molded parts, a detailed cockpit or at a very minimum, a decent scale propeller.
Anyway, as I said, I am super happy with it and I consider it well worth the 30ish Euros that costed me. Now, besides a C-47 that I am building, I think I can call my air toys army done and finished… I guess it is time to start with the water ones, but still not sure if Stolzdorf has a sea. At the very least sure it has a river and a lake, so don’t expect a 1:16 Bismark. 🙂


Muy bueno Rad, espectacular el camo y el piloto, una lastima que no sea operativo, la defensa A/A de Stolzdorf lo agradeceria…
LikeLiked by 1 person
Nah, no compensa los dolores de cabeza de hacerlo RC, para algo que no voy a usar nunca.
LikeLike
Muy interesante el artículo Rad, te ha quedado espectacular, tu diorama se verá genial
LikeLiked by 1 person
Gracias, Herr Charly!
LikeLike
Interesante artículo Rad, gracias por compartir tus experiencias, te ha quedado espectacular, se verá genial en tu diorama.
LikeLiked by 1 person