

For a moment, I didn’t recognize myself. When I I surf the net and I find a new toy, and I really, really like it, it takes me months if not years to decide to finally getting it. I always try to convince myself saying things like “It is too expensive”, “I don’t need it”, “I am not going to use it” which is partially true… and then, by the time I decide to getting it, it has been discontinued and it is nowhere to be found, unless paying the scalpers price, which is the already expensive original price, multiplied uncountable times. Feeding scalpers and paying exorbitant prices is something that is not going to happen, no matter how hard I wanted the toy.
This aircraft, instead, was almost an impulse buy. I needed to keep my mind busy in something different than the tanks I kept building for the past years, so I looked for the scarce different things in the 1/16 scale. Suddenly, I found it, and I liked it. Then, I immediatelly combed the internet looking for the cheapest European shop that had it in stock, and to my horror I found it was sold out pretty much everywhere. Fortunately, and when I was almost giving up, I found an Italian shop called Piccole Ali which had only one in stock, with a big discount, with a free wheel retracts set (priced over 150 Euros!) and free shipping which always helps to decide extreme cheapskates like me. I hesitated a bit of getting it, but I had money in my super secret hobby account, and I clearly saw it was a now or never decision. So, I shut my eyes while clicking on the “Pay” button. I ordered it and I got a coffin-sized box three days later. For the guys that like trying to smuggle things at home without the wife notizing, well, you are going to have a hard time with this one. Anyway, I am glad I got it, because it seems there are no more. I grabbed the last one just in time, pfew.

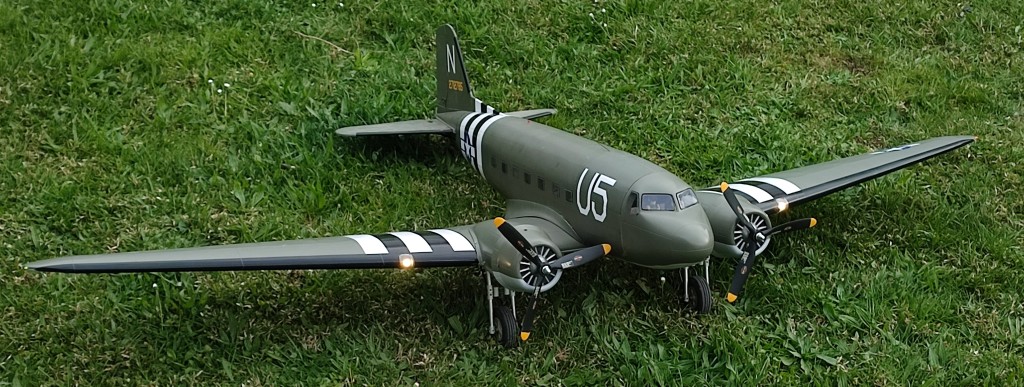
Here it is, my C-47 Skytrain – Misirlou. 1800 glorious millimeters of wing span, which, translated to scale, is an almost exact 1/16 scale, matching the rest of my toys. Gooood! According to the box, this kit was made by VQ models, which after some research, it seemed to be some sort of sweatshop in Vietnam where workers were paid with little more than rice and lashes in the back. The plane came in what is called an “ARTF” status, which in theory means “almost ready to fly”. But… what does that “almost” mean? Well, in the case of this kit, it means it comes with no motors, no speed controllers, no battery, no servos, no wiring, surprisingly even no propellers, and heck! almost no instructions, because the piece of paper with vague diagrams that came inside of the box cannot be considered a manual. It is true you don’t have to assemble each tiny balsa wood part, and neither cover them with tissue, like I did with my P-40 and with my BF-109. That work is already done by forced labour in the third world for you, but adding all the other components is definitely a challenge for many and a no-go for the faint of heart. You have to work very carefully on the model, a false movement and you are pretty much screwed, because there are no replacement parts available, and I have no idea of how could somebody fix something like this.
For a long while I panicked and I regretted of getting it. After my P-40 catastrophic crash and its almost unfixable status, I was very reluctant of getting any other RC balsa plane. They are a tremendous amount of work and very fragile, but still, I felt this one was worth a try, and, if I ended not liking it, well, I could always sell it not losing any money of even getting some profit. If some people think the RC tanking is a hobby for rich people, man, you have to see the price tag of most of the bigger flying toys. Hint: Only the motors of some of those planes costs more than all of my toys, including my real 1:1 scale car and motorbike together, no kidding!
Building process.
I can openly say that it took me several years to finish this thing. Even when some people claim it can be built under 8 hours (HA!) it took me around 4 years, but of course, the vast majority of time was spent in thinking what to do with it and how to work on it. I also found it was very hard to work on it due to the huge size it has, and having children and pets around does not help neither. This is not something you can leave at the corner of a table. First of all you need a massive table, but even if you have one, remember: A false movement, a cat scratch, or drop it as little as 20 centimeters, and it will be broken forever. So, I did not really work seriously on it until I had a fairly decent working room at the basement, fully prepared and ready for it. Then, when I was going deeper into it and started ordering the required parts, we had some sort of importing goods ban here in Austria, which left it stranded for another long couple of years. Now, that the ban is gone. It was time to go back to it, no more excuses.
As mentioned, the manual confused more than help, but I found a guy in Youtube called Mathew, owning the “ScaleMeDown” channel, building his kit, but the DC-3 version, which is exactly the same but painted with civilian colours. I found his guidance and mastercraft absolutely excellent and he gave me some ideas. He is an absolute expert in RC planes and he really knows what he is doing. Well worth to follow his videos but it can be frustrating to see how many expensive machines and tools he uses which are unaffordable and unknown for most mere mortals.
There were many things to consider, like harnesses, where to put the wires, where to drill and more. But the thing that weighed down my build the most, is that I seem I got a lemon. Yup, I am pretty sure my plane is, somehow, defective. The center wing piece did not smoothly fit the main fuselage. There is like 3 millimeters offset which made very hard to fit both parts together. The only reason for justifying this, is it might be an assembly error in that sweatshop in Vietnam. I could not find anybody else with this problem, and fixing it was too complicated. I could not make any press on it, neither hit with anything because at the end of all, the plane was still made of balsa and covered with a thin coat of plastic film.
Fitting all the wiring was another nightmare. You have to run a lot of cables through the wing sections, without any posibility of seeing anything. For wiring it I tried everything I could think of… To tie a nut to the wire, to use magnets, jiggling and trying to catch the wires with a wife’s crochet hook, call the children with their thin figers… after hours of desperation I managed to accomplish my task with a mixture of all of those techniques together. It was really frustrating and desperating, because you cannot see what you are doing, and the last thing I wanted to do is to make a lot of holes just to find they were not needed. The “manual” of course mentions absolutely nothing about the wiring. C’mon, VQ models!
The retracts kit is an example of, sometimes, you cannot have everything in life. The original fix struts are very cool to see, detailed and with a very nice spring suspension system. All of that is lost when you fit the retracts, which have way less detail and no suspension at all. But at the other hand, it is a pleasure to see the wheels collapsing inside of the nacelles. To install them was a trial and error and patience exercise. I saw nobody that could fit it perfectly on the first shot… and neither on the last one, because they don’t conform perfectly. But hey, they kinda work now. And I love how it looks when the wheels are retracted.
If you don’t know this plane you might be concerned about the wheels still being visible. Well, this is absolutely normal. In fact this aircraft was able to land with the wheels retracted.
I also had some problems with the cheapo speed controllers I ordered. It seems no matter what I did, one motor started earlier than the other. It really pissed me, but after watching a miriad of videos of the real plane starting the motors and taking off, I found they had the same issue. Considering how fragile is the plane, and how hard was to fit the speed controllers, I decided to call it a day and left the cheapo controllers there, even when I already had a pair of a slightly less cheap controllers around.
I also took a very loooong look at the few videos and build reports of the RC version, and most, if not all of the maiden flights ended in a crash due to this plane has an error in the gravity center causing and weight balance problem. That was just way too much, and I decided it was going to be stupid of me to even try to fly it. If I wanted to fly, I still had the Corsair after all, or could get any cheapo foamie somewhere else. I focused the build in a nice scale looking that turned to be an expensive decoration for the diorama room, but still with all RC capabilities any big child like me could dream of. That means I did not pay any real attention to the two speed controllers quality or the twin motor specs. I just got the cheapest components I found online, which in theory are still enough and more than adequate for a flight, but that is something we will never know anyway.
Installing the motors was another challenge, because they have to fit nicely in the nacelles, and of course there is no straight fit. No matter what you buy, you have to get or to make some sort of motor mounts and shim them until the propeller spins freely. I lost the count of the tries it took me to get it ironed out.
Electronics.
As you all probably know by now, I don’t conceive a toy without lights and sounds. For this one I picked an unused Dasmikro Mini V2 that I had at home, and fitted all the lights and functions needed. I enjoyed the process quite a lot, and I enjoyed even more the radio programmation I had to do for this toy, because it was something new.
Channel 1: Controls left motor’s throttle.
Channel 2: Controls right motor’s throttle.
Channel 3: Controls the rudder.
Channel 4: Controls ailerons.
Channel 5: Controls elevator.
Channel 6: Controls the flaps.
Channel 7: Controls the retracts.
Channel 8: Controls the sounds and lights.
Everything has been studied and planned in depth. For example, with the left stick in my radio I can control the two motors throttle at the same time, but also I have two side sliders which let me control each of the motors independently, synched with the sound. This ended to be super fun to do, besides extremely useful when taxing the plane at the backyard.
The radio has been programmed in a way that the travel of the servos are limited to the perfect and exact point where they have to be, the flaps move at super slow motion like in the real thing, and the retracts won’t collapse until I press a logical switch combination, so accidents won’t happen.
The lights aspect is not too complex but realistic and adequate. I had to research a bit because I had a vague idea of the lights that those planes had. I found funny they have basically everything what a boat has, in the same colors and in the same places, but of course boats have no wings, neither the planes have anchors, lol.
Prior to publishing this entry many people saw the plane in action and laughed about it being some sort flying disco at best, a ladies nightclub at worst. Those comments ended pissing me, because all of those lights are real, and are exactly the ones you can find in any plane, back to 1944 or today.
The lights system consist of:
-High power landing lights in the wings.
-A pulsing beacon red light on top and down of the fuselage.
-Position lights, one green light on a tip of a wing, another red light on a tip of the other wing, a white one in the rear.
-A three pulse white strobe light in the tips of the plane.
-An interior cockpit light.

Jesus, I LOVE how it looks.

And I also love the power of the landing lights.
About the sounds, I got lazy and this time I did not create the motor sounds myself. I am not going to move it too much anyway, so I used an original Benedini twin radial motor sound set, and spiced it with some music, ambient sounds and the erotic voice of my friend Jim James. I wanted an American giving some custom voices and shouts and that is what I ended fitting. Thank you my friend, I hope you had as much fun recording this as I have fitting and playing the voices. Definitely, you are getting an honor place in the heart of Stolzdorf.
Painting process.
I am ashamed of writing this part of the review. The plane arrived pretty much as it is, painted, with those cool fuselage marks, the Normandy invasion stripes Stolzdorf invasion stripes and the American stars. I feel it looked better than what I could paint myself, so I decided to not to repaint it, besides adding a number plate in the tail and a the “Misirlou” name (yes, like the ancient Greek song covered by Dick Dale, used in the Pulp Fiction OST) which I painted with my own stencils. I also wanted to paint some nose-art in the plane, but the huge size and fragility of the toy made me discard the idea. The plane was just too big and too uncomfortable to paint anything with a brush on it. This time, I had the idea of ordering custom decals somewhere else. When there are so many colors around it just does not have sense to use stencils, besides it would never look as good as the decal. You all know I love my stencils, but sometimes you do good using decals… but nope! Ordering decals is against my religion! I refused to give money to somebody else and I played my DIY route as I always tend to do, and I ended creating my own water transfers/decals and stickers. More info comming soon.


Pics look cool, but I guess you are willing to see it moving, don’t you?
Well, it moved, but that is not what you were waiting for, right? Ok, look here:
Now we are talking! What?!… Not enought?! You want to see it flying?! Well, me too, but sorry, that is not gonna happen, I lack the guts. 😦
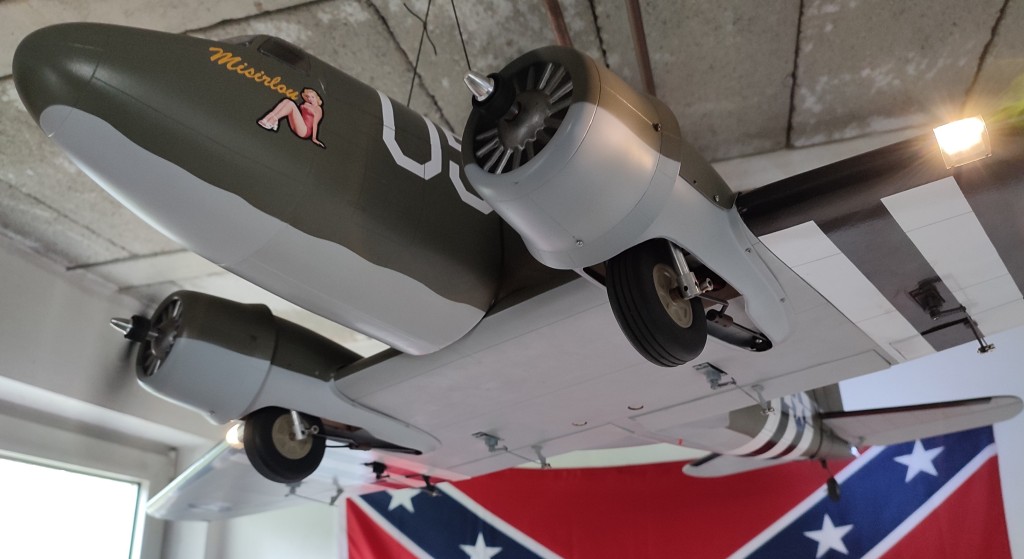
Summary.
I like the plane. I believe this is a great add-on for my scale city. I had it for several years over the floor, eating a massive space in the diorama room until I hanged it on the ceiling, which is what I wanted to do with it since the very beginning anyway. Being an ex-paratrooper myself, having a paratrooper plane flying over Stolzdorf was a must and it grabbed deeply my heart. The overall building quality is not bad… I even can say it is good, except for the catastrophic fuselage-wing join, but I guess considering it was been produced by forced labour in a dark place, it could not be better made.
The lack of decent instructions should be fixed immediately, the ones in the box are unacceptable, plain and simple. The moving retracts should be much better engineered and some hardware parts were missing, like spacers and so on, but I can live with that.
Some extra parts would be more than welcome. Finding scale like propellers was a real challenge. I had to find some of them with a vintage look, and for a heavy plane. If that does not sound not hard enough, one had to turn inwards and the other outwards, difficulting the find much, much more. Nowadays in this drone’s world, most propellers are tiny and look like futuristic shurikens in radiactive glowing colors.
Other parts like scale antennas would be a nice addition, but what I really missed, besides the propellers, were a couple of pilots. Fortunately, my friend Charly came to the rescue and he 3D printed me a couple of them which I proudly fitted in the cabin of the plane. I am glad he did it and I can’t thank him enough, but it would be much better having them already included for obvious reasons.

Still, and after all, I like my plane. Having something sort of “exclusive” that almost nobody has, is cool. I can see most people would like to have one, because when they see my diorama room or videos, the first, and sometimes the only thing they ask is about this plane. Maybe because of it’s imponent size, I don’t know.
But looking back to all my planes experience, I can say I enjoyed the Guillow’s balsa kits much more. They were much more work, but it was pretty much straightfoward and way easier to fix. I believe it took me less time to build the other planes than to find how to run the wires or fix the faults of this C-47. That leads me to answer one of the questions many people ask me. “Why don’t you buy second hand toys? They are cheap!” Because that mostly means buying somebody else’s problems and even worse, buying somebody else’s attempts to fix the problems, lol. That is not worth for me. Even when I am a master on cheapskating, I’d rather pay the full price of a new toy than having a sustantial save but getting eternal headaches with someone else’s job. With this plane, even when it was new, I felt the same. I’d rather build the entire plane from the start, than trying to fix and install the parts as it arrived.
Anyway, I took a look at the Stolzdorf’s skies… There is a P-40 (Yes, still in eternal repairs), a Corsair, this C-47, and at the other side of the battle a BF109 always in patrol and a Natter ready to be launched… I believe this makes my flying toys collection complete, making me pretty sure I will not be getting more.
That means… it is time to focus on the swimming toys. Let’s start with the Stolzdorf’s kriegsmarine!

Beautiful work at all levels as usual. You could get a job in the motion picture industry for sure. You’re creativity is seemingly endless my friend!
LikeLiked by 1 person
Thank you! Glad you liked it, but a big chunk of the fun lies in your voice acting!
LikeLike
Nice story on that beautiful plane! As alwyays it´s a pleasure to read your entry, even more as I know the size of “Misirlou” personaly…
Looking forward to invading Stoltzdorf soon!
LikeLiked by 1 person
expectacular ese avión, así como todo lo que le rodea, poco a poco estás consiguiendo un diorama distópico espectacular, me encanta, ánimo
LikeLiked by 1 person
Falta ramen rad ;-), eso te pasa por no pedir la maqueta a conbini
LikeLike
Manda fideos, cachoperrroooo.
LikeLike